
pibot_cnc_laser_series:v496_pro:test_rj12:start
3.1 Test RJ12 Port
Advanced Tests · Optional · UART2 bench test for a compatible PiBot pendant or I/O expander
ℹ️
Objective: Verify that the V4.96 Pro can communicate with a documented PiBot-compatible RJ12 pendant or I/O expander through UART2 before installing the accessory on the machine.
⚠️
RJ12 and the OLED interface share GPIO.25 and GPIO.27. They cannot be enabled at the same time. Power off before connecting or disconnecting the accessory, and never assume a telephone cable or third-party RJ12 pinout is compatible.
1
Prepare the Accessory and a YAML Copy
- Use only the documented PiBot RJ12 module, cable, and compatible pendant or I/O expander.
- Back up the working YAML and edit a copy under a new filename.
- Keep motors, spindle, laser, and unrelated accessories disconnected during this bench test.
- For a wired PiBot Pendant V4 test, follow the product connection instructions and do not install the pendant battery.
2
Disable OLED and Enable UART2
- Comment out or remove the complete
i2c0:andoled:sections. - Add the UART2 configuration below using the confirmed V4.96 Pro direction: TX
GPIO.27, RXGPIO.25. - Upload the edited file, select it with
$Config/Filename, and restart FluidNC.
uart2:
  txd_pin: gpio.27
  rxd_pin: gpio.25
  rts_pin: NO_PIN
  cts_pin: NO_PIN
  baud: 1000000
  mode: 8N1

uart_channel2:
  report_interval_ms: 75
  uart_num: 2
3
Connect the RJ12 Accessory
- Disconnect USB and main power.
- Connect the V4.96 Pro UART header to the RJ12 module, then connect the approved RJ12 cable to the compatible accessory.
- Check connector orientation and cable routing before applying power.
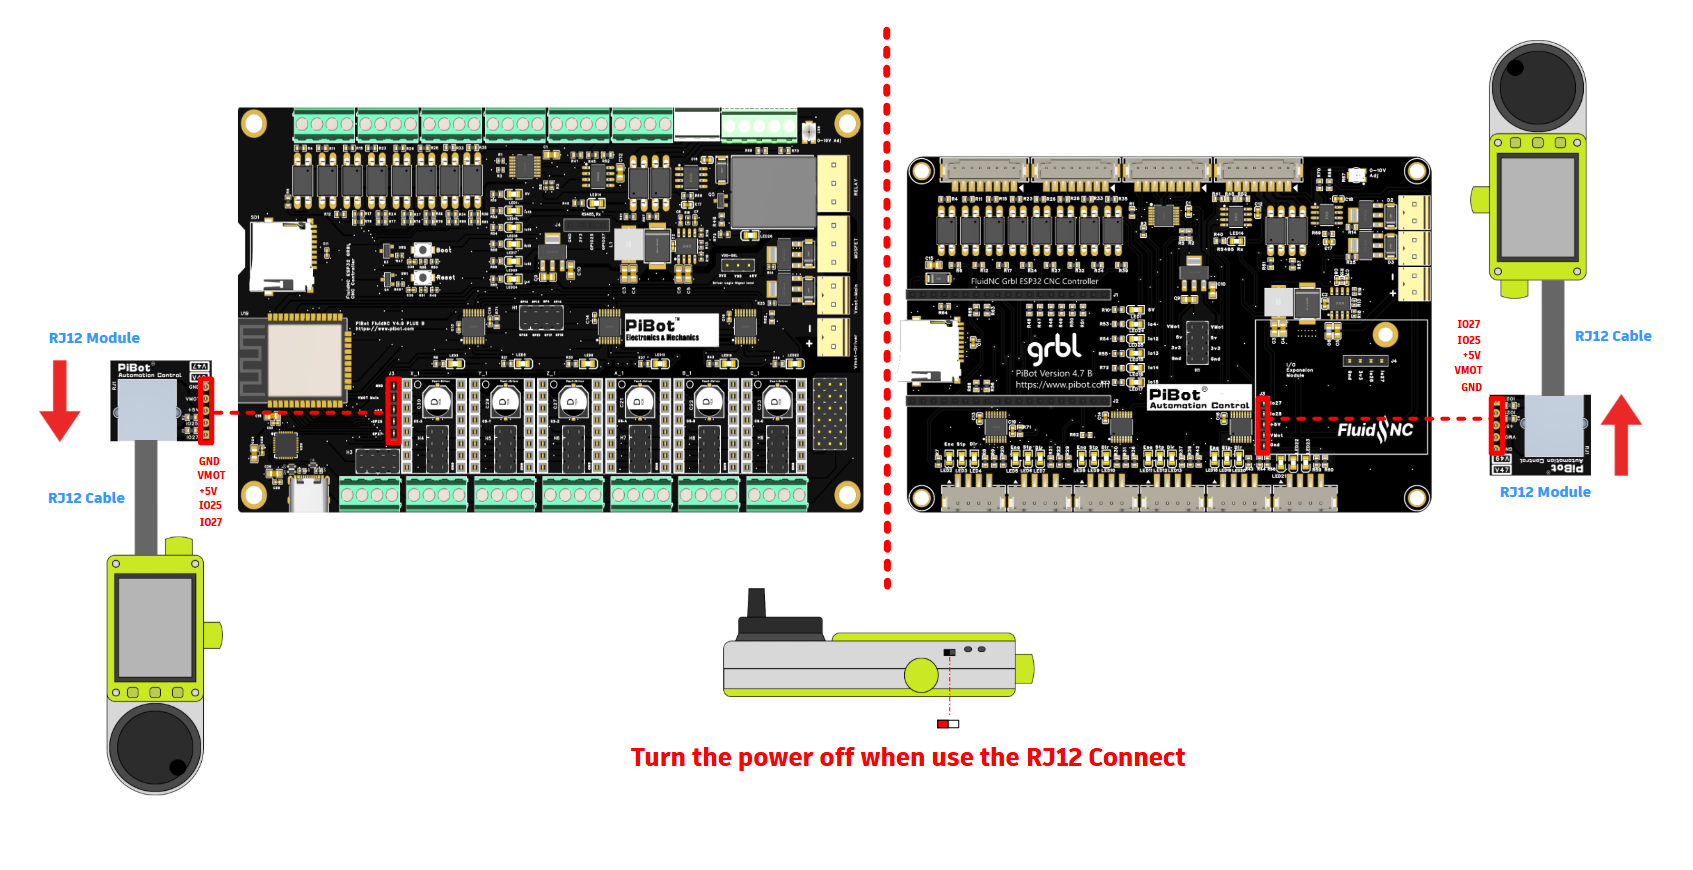
Reference connection: use the documented PiBot RJ12 module and cable; verify the exact board and accessory orientation before power-on.
4
Power On and Test Communication
- Apply power and review the FluidNC boot log for YAML or UART errors.
- For a pendant, operate one safe control at a time and confirm that FluidNC reports the expected state.
- For an I/O expander, operate one documented input or output at a time and confirm the matching state change.
- Keep motion, spindle, and laser disabled until communication is stable.
✓
Pass: FluidNC starts without UART/OLED conflicts, UART2 reports no error, and the connected compatible accessory communicates reliably at
1000000 8N1.✗
If the test fails: power off first. Confirm that OLED is disabled, the active YAML uses TX
GPIO.27 and RX GPIO.25, the baud rate matches the accessory, and the approved cable is fully seated. If the controller will not start, disconnect the accessory and restore the backed-up YAML before diagnosis.ℹ️
For permanent installation details, continue to 4.4 Connect Pendant or 4.5 Connect I/O Expander.
pibot_cnc_laser_series/v496_pro/test_rj12/start.txt · Last modified: by 127.0.0.1