2.3 Upload Firmware and YAML
Check List · Step 3 of 12 · Install FluidNC online or offline, then load the V4.7B I/O-test YAML
ℹ️
If the supplied FluidNC firmware and V4.7B YAML already start without errors, keep them and continue to Step 2.4. Reinstallation is optional and is normally needed only for recovery, replacement modules or an intentional firmware update.
⚠️
Correct processor: V4.7B uses a plug-in classic ESP32 / ESP32-WROOM-32 module. Never select ESP32-S3, and never run files whose names end in
_s3.
RECOMMENDED
🌐 Method A · Online Web Installer
Chrome or Edge, internet connection, visual installer and the clearest path for a first-time user.
ALTERNATIVE💻 Method B · Offline Windows Tools
Official FluidNC Windows release ZIP, local batch files and FluidTerm. Useful for recovery or an offline workshop PC.
⚠️
Choose one firmware-installation method. Do not run the online and offline installers one after another. Both methods continue to the same “Upload and Activate the V4.7B YAML” section below.
0
Shared Preparation
- Disconnect motors, external stepper drivers, spindle, laser, relays and other machine loads.
- Use a known-good micro-USB data cable connected to the plug-in ESP32 module.
- Confirm the classic ESP32 appears as a serial / COM port.
- If Windows does not show a port, install the USB-to-UART driver used by the module. The PiBot-supplied module commonly uses CP210x: official Silicon Labs CP210x driver or PiBot local copy. A replacement module may use a different USB bridge.
- Back up any existing YAML, macros and WebUI files before a fresh installation or filesystem replacement.
METHOD A
Online · FluidNC Web Installer
Recommended for most users1
Open the Official Installer and Connect
- Use desktop Chrome or Edge and open the official FluidNC Web Installer.
- Click Connect, then choose the serial port belonging to the classic ESP32 module.
- If the installer asks for permission to use the serial port, allow it.
- If connection fails, try another data cable. Follow the installer’s BOOT / EN prompt only when requested.
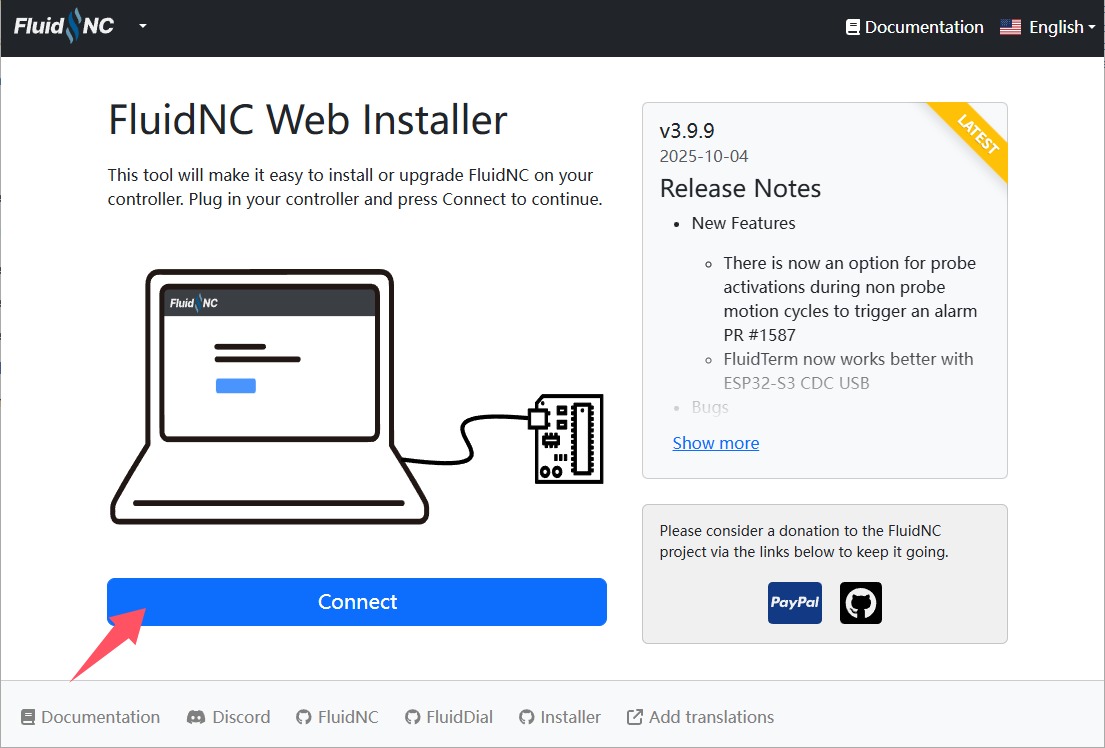
Click Connect, then select the ESP32 serial port.
2
Select Install, Current Stable Release and Classic ESP32
- Open Install.
- Select the current stable release offered by the official installer.
- For Processor type, select esp32 / ESP32-WROOM.
- Do not select ESP32-S3 even if it appears in the list.

The screenshot version is an example; follow the ESP32-WROOM processor label rather than the pictured version number.
3
Select Wi-Fi and the Installation Type
- Select the wifi firmware variant so the controller can provide WebUI.
- Firmware update is appropriate when FluidNC already works and you want to preserve filesystem data.
- Fresh install is appropriate for a blank replacement module, incompatible old firmware or recovery from a damaged installation.
- Fresh install erases existing files and configurations. Back them up before continuing.
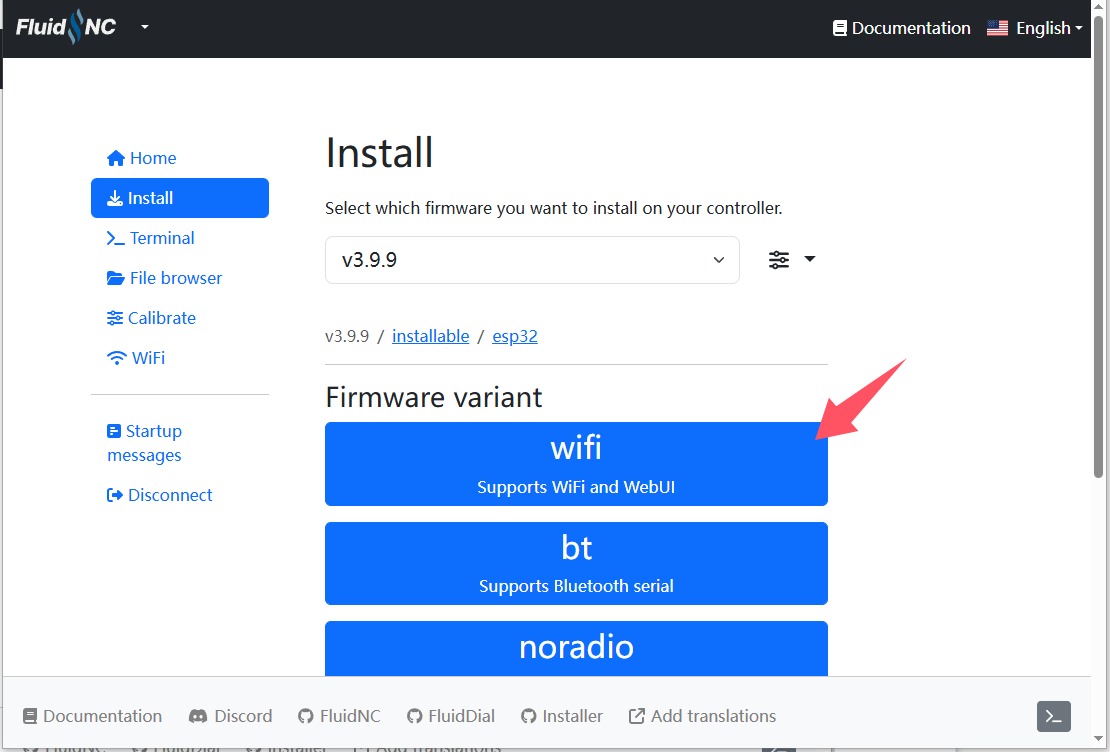
Select the Wi-Fi firmware variant.
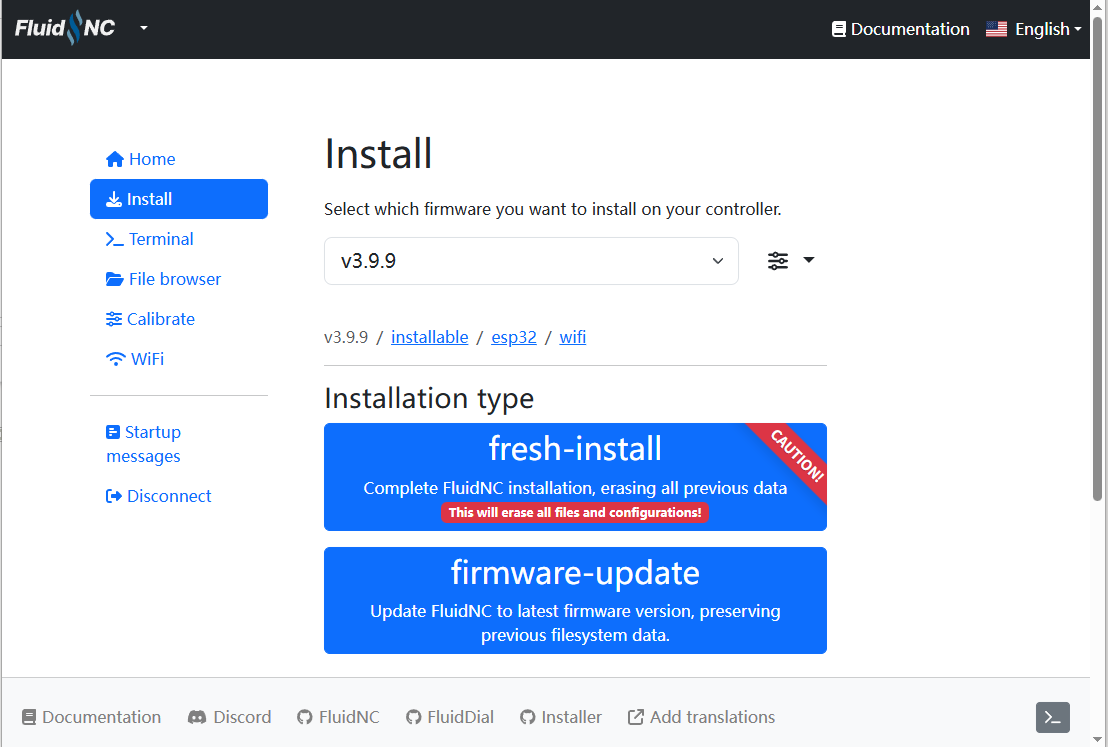
Fresh install erases files; firmware update preserves filesystem data.
4
Include WebUI and Complete the Installation
- Enable a supported WebUI option. The screenshots and the rest of this checklist use the WebUI 2 file-browser layout.
- Click Install and wait until the progress reaches 100%.
- Do not unplug the USB cable, close the browser or remove power during erase/write/verification.
- The official installer may change its layout or offer additional WebUI choices; the required selections remain classic ESP32, Wi-Fi and a WebUI.
Upload speed: 921600 is faster, but some USB cables, USB-UART chips or computers are not stable at that speed. If connection, writing or verification repeatedly fails, select 115200 under Installation speed and try again. This setting changes only the firmware flashing speed; it does not change your machine or FluidNC communication settings.
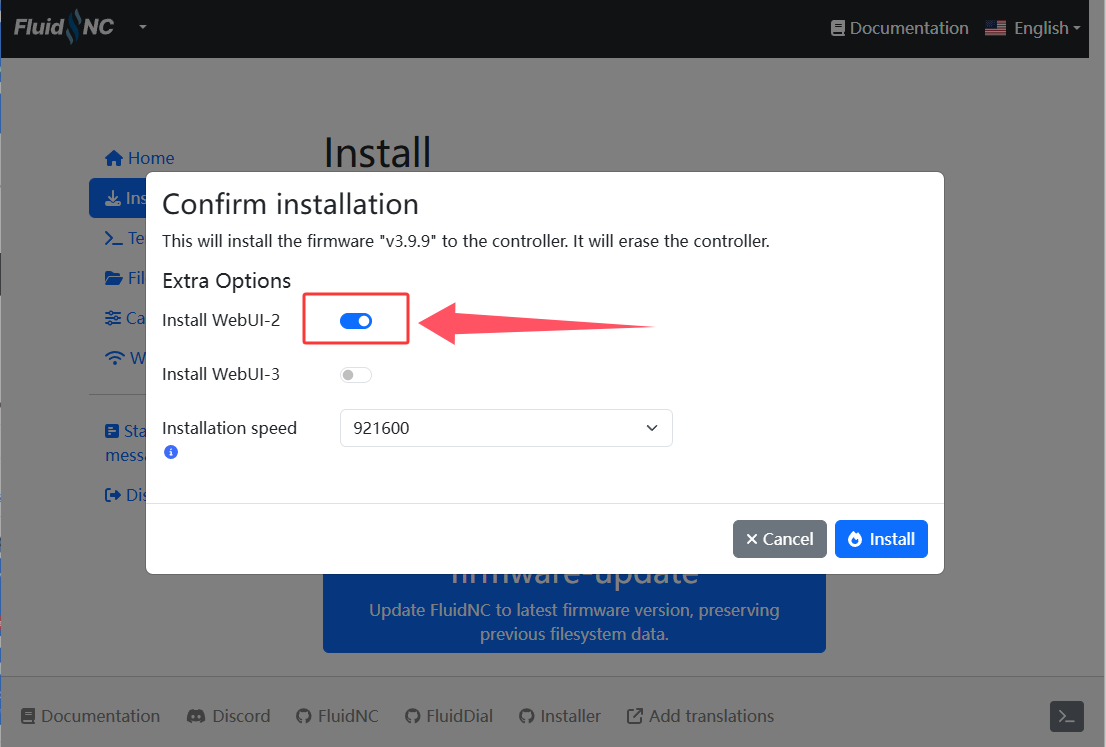
Enable WebUI 2 when following this checklist layout.
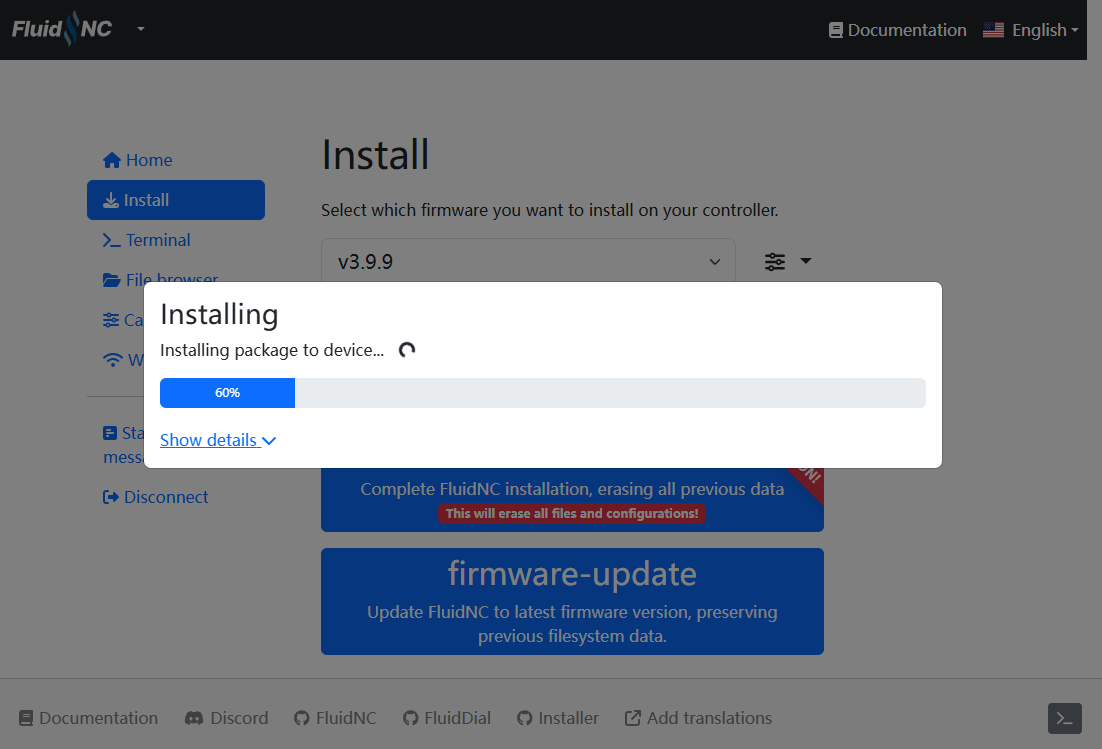
Wait for the installer to report completion.
The installer screenshots are shared with the V4.96 tutorial because both use a classic ESP32. Official version numbers and minor interface details may change.
METHOD B
Offline · Official Windows Release Package
Classic ESP32 scripts onlyDownload ZIP
Extract Folder
Run install-wifi.bat
Upload YAML
1
Download and Extract the Official Windows Package
- On a computer with internet access, open FluidNC Official Latest Release.
- Download the file named like
fluidnc-vN.N.N-win64.zip. - Copy it to the workshop PC and extract the entire ZIP to a normal folder.
- Do not run the batch files from inside the ZIP preview.
2
Install Wi-Fi Firmware for the Classic ESP32
For V4.7B, run
install-wifi.bat. The scripts containing _s3 are for different hardware.install-wifi.batWrites the Wi-Fi firmware for the classic ESP32, then starts FluidTerm.erase.batOptional destructive recovery step. Erases everything; use only for incompatible/corrupt firmware, then run install-wifi.bat again.install-fs.batOptional first-install filesystem step. Adds/replaces WebUI filesystem data but erases existing local files.- Double-click
install-wifi.batand wait for the write to complete. - If the tool cannot enter download mode, follow its BOOT / EN instructions.
- If the offline tool repeatedly fails while connecting or writing at
921600, make a backup copy of the batch file, open the working copy in a text editor, change--baud 921600to--baud 115200, save it, and run it again. - When the script finishes, FluidTerm opens automatically.
⚠️
Offline filesystem choice: on a blank/erased module, either run
install-fs.bat or upload wifi/index.html.gz with FluidTerm. Do not replace the filesystem on a working controller until its YAML, macros and other files have been backed up.3
Upload Local Files with FluidTerm
⊞
fluidterm.batOfficial local serial terminal and file-upload tool included in the Windows release packageinstall-wifi.batstarts FluidTerm automatically after flashing. To open it again later, double-clickfluidterm.bat.- Select the COM port belonging to the V4.7B classic ESP32 module.
- Press CTRL + U for each file that must be uploaded.
🌐
wifi/index.html.gzFluidNC WebUI file. Upload it when WebUI is missing/outdated or when you used only install-wifi.bat. Skip it if install-fs.bat already installed the same WebUI successfully.📄
v47b-xyyza-standard-config.yamlV4.7B checklist configuration. Upload this exact test file and wait for FluidTerm to report that the transfer is complete.Recommended naming: keep
v47b-xyyza-standard-config.yaml so it is clearly identifiable, then activate it with $Config/Filename=v47b-xyyza-standard-config.yaml.Optional default-file method: make a copy of the test YAML, rename the copy to config.yaml, upload it and confirm overwrite. Back up the old config.yaml first. If the controller was previously set to another filename, also send $Config/Filename=config.yaml; uploading the file alone does not guarantee that it becomes active.
BOTH METHODS
Upload and Activate the V4.7B Test YAML
📥
Download the exact file:
v47b-xyyza-standard-config.yaml. Keep its filename and indentation unchanged.1
Upload the YAML
- Online/WebUI: connect to the FluidNC access point, open http://192.168.0.1, open File browser, click Upload and select the V4.7B YAML.
- Offline/FluidTerm: if the YAML was uploaded in Method B above, do not upload it again; continue directly to activation.
- Do not rename it to
config.yaml; keeping the board-specific filename makes it easier to identify and recover.
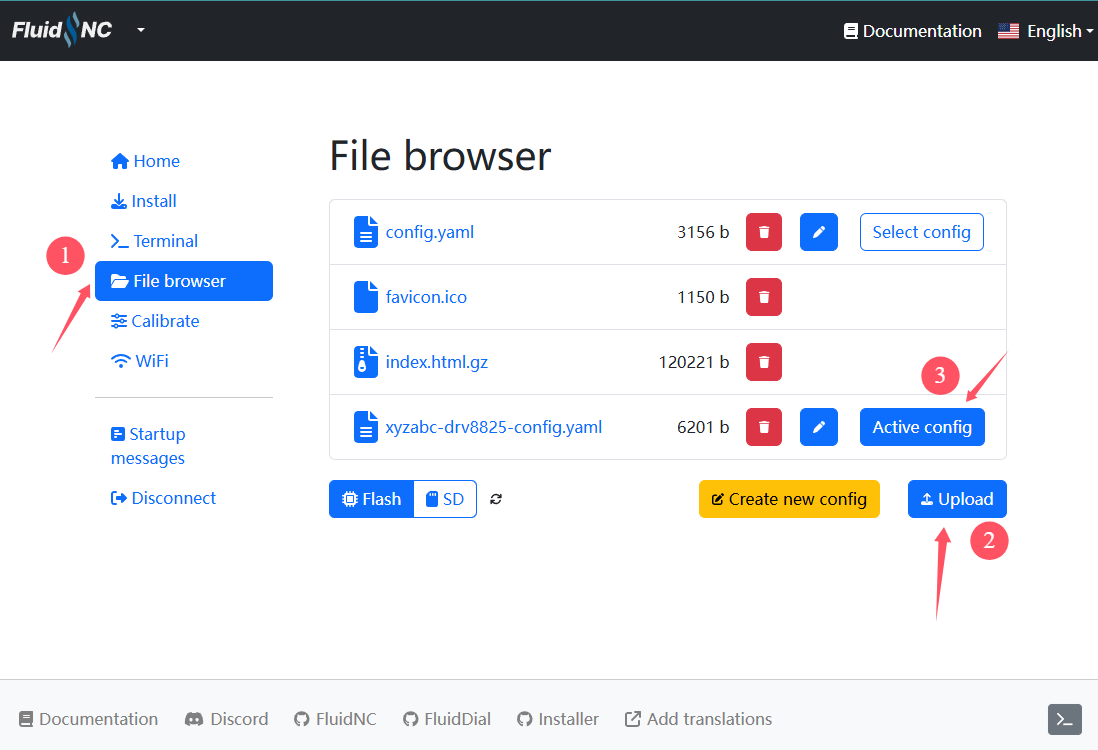
Upload the V4.7B YAML, then select it as the active configuration.
2
Activate, Restart and Read the Startup Log
- Use the File browser’s Select config / Active config control, or open the console and send:
$Config/Filename=v47b-xyyza-standard-config.yamlSelect the V4.7B I/O-test YAML.- Restart from WebUI, press CTRL + R in FluidTerm, or power-cycle the controller safely.
- Read the complete startup log and confirm PiBot V47B.
- Do not continue if the log reports a YAML parsing error, pin conflict, repeated reset or invalid configuration.
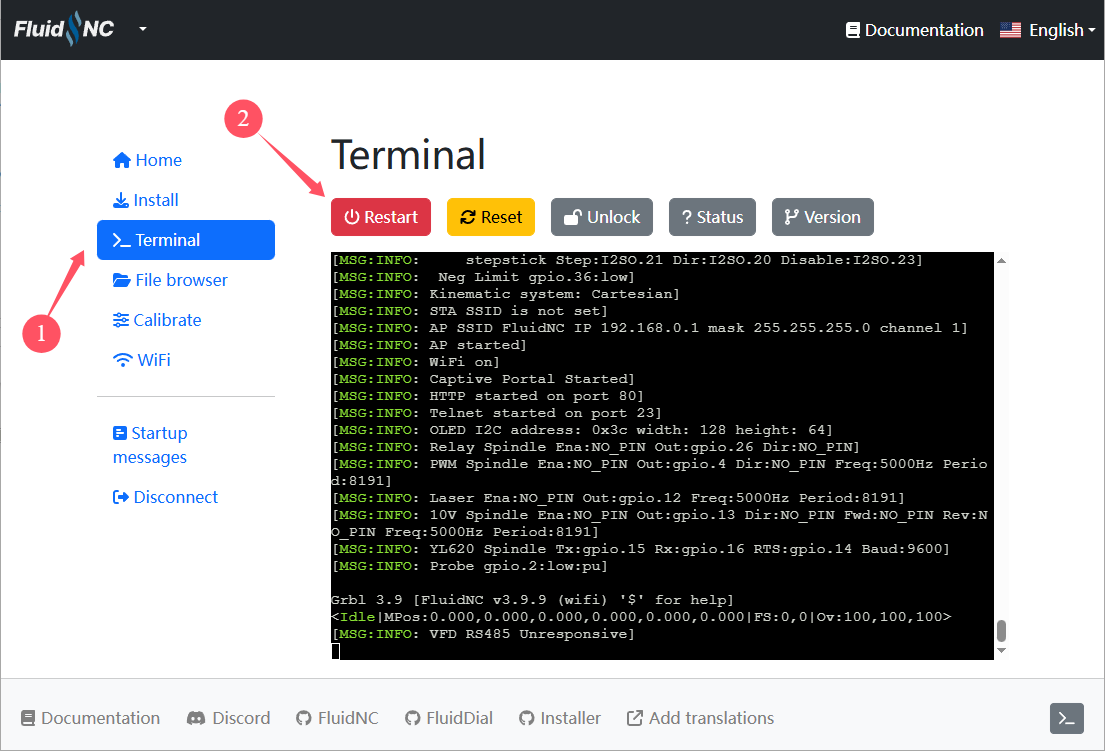
After restart, check the startup messages before continuing.
⚠️
This is an I/O-test YAML, not a finished machine configuration. It deliberately maps XYYZA signals and diagnostic outputs. Do not home, cut, engrave or operate a real machine with it unchanged.
✓
Expected Results
- FluidNC starts on the plug-in classic ESP32 module.
- Wi-Fi and WebUI are available.
v47b-xyyza-standard-config.yamlis the active configuration.- The startup log reports PiBot V47B with no YAML parsing or pin-allocation error.